Blog moved to Medium

January 10, 2020

For a while now, I moved my blogging to Medium.

Recent posts:


Clean sources at queue time without build definition update

June 12, 2018

In the old xaml TFS build era there was an option which seemed to have disappeared with the arrival of the new build architecture: cleaning sources at queue time without a modification to the build definition.

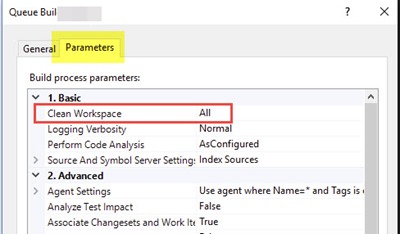
queuexaml

After queuing the build from Visual Studio you had the option to navigate to the parameters tab where you could choose on the fly your preferred method of cleaning the workspace, without forcing an upfront update to the build definition.

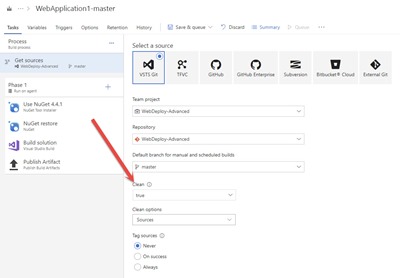
Now, with the new build system, the queue dialog window has changed a bit and that specific option is not available anymore out-of-the-box. The “Clean” option in the build definition also seems to be limited to a fixed true/false value from the dropdown.

CleanSources

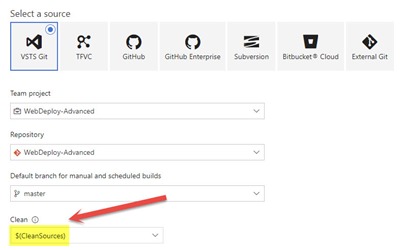
Luckily, the field can also hold a custom variable which has been defined in the variables section. Don’t forget to mark the custom variable as “settable at queue time”.

variable

CleanSources2

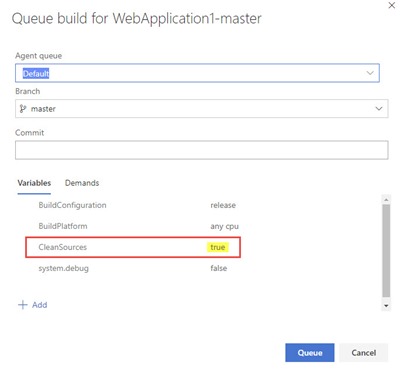
Queuing a new build will now nicely provide you the option to choose the non-default value.

queuebuild

Happy building!


5 years of Techorama

May 27, 2018

Only a few days ago we celebrated 5 years of Techorama in Belgium and I wanted to take the time to reflect a bit on what we have realized in those 5 years.

TechoramaRobots

Why Techorama?

When we (Gill, Kevin & myself) started preparing for the first edition of Techorama, the main goal really was to provide an alternative for the old TechDays conference which was organized by Microsoft in Belgium. At that time we were already heavily involved in community events via user groups and the yearly Community Day event … and we thought why not bundle our efforts somehow to come up with a new event as a potential replacement for TechDays.

CommunityDay2013Visug

It was more an instant reaction to the rumors that Microsoft wasn’t planning TechDays anymore in 2014. We all have been invited as speakers to DevDays/TechDays in various years and we couldn’t imagine a year without a (bigger) conference in Belgium where we could also learn from international speakers. With the final blessing and partner support from Microsoft Belgium for year 1 we decided to setup a new company and dive into the new world of event management.

How Techorama?

To start our private company we needed some cash/capital and the initial personal investment we made was also closely related to the commitment towards each other and the future success of Techorama. We wanted to go for the bootstrap startup model. The first 4 years we agreed to keep all earnings inside the company and invest year after year in the Techorama conference experience for all our stakeholders: attendees, partners and speakers.

Some of the (simple) principles we adopted from the start:

  • No salary
  • Don’t outsource work you can do yourself
  • Hire true professionals for work you do not master yourself
  • Invest time/effort in stuff which will be crucial for the long term success of Techorama
  • Automate as much as possible in things which are not the core business
  • Be responsive to any question from our stakeholders
  • Nothing is impossible. Fail fast and try again. There will always be a solution!
  • No concession on quality
  • There is no status quo

Bootstrapping a new business can be hard. We were lucky to have an income from our other job and in some way we managed to organize all work for Techorama in our spare time (after hours + weekend). It hasn’t been easy for sure to find the right balance between our full-time jobs and our personal life. The people who know us a bit more will realize that all three of us have quite a different personality/character but we share some important key values to run a business together. We have proven to be compatible. We respect and trust each other as a partner and try to inspire each other to go the extra mile.

It’s only since last year that we introduced the official (paid) Techorama working days where we come together during business working hours (9AM – 5 PM). Upfront we plan about 2 of these working days a month and decide last-minute where to work from and seeing each other face-to-face. This can be our home or a meeting room we rent. Unfinished work for Techorama is taken care of in our spare time.

What Techorama?

Our vision for Techorama has always been to provide a premium conference experience where the focus is not only the content and the sessions. We have been to many different international conferences and we know what we like as an attendee/speaker. The experience is our cornerstone and we try to surprise with little details to make a substantial difference.

https://platform.twitter.com/widgets.js

The last couple of years this modus operandi has also been picked up by our partners who add extra entertainment to their presence.

To convince our attendees to buy a ticket for Techorama, it’s primarily the content and the quality of speakers that plays an important role. For that reason we only contact/select speakers which are experts in their field, without going in a pure marketing direction to promote products/services.

Anyone who has been multiple times at Techorama will notice that we do not deliver a copy-paste experience. Every edition is different and we keep improving what can be improved. However we always remain faithful to a movie theatre venue with big screens, comfortable seats and exquisite food.

https://platform.twitter.com/widgets.js

Who Techorama?

It goes without saying that for organizing Techorama a lot of people are involved and we are lucky and thankful to be surrounded by an exceptional dedicated team of volunteers from the local community in Belgium. Looking back at their efforts over the last couple of years, I find it interesting to see that everyone in the team has a (different) personal set of skills which contributes to the overall success of Techorama. Without these people, no Techorama! A big thank you to Andy, Ben, Jens, Jordi, Jorg, Karim, Kenny, Lindsey, Maarten, Mathias, Mike, Nico, Thomas, Tom and Wesley.

The evolution towards 1500 attendees

Growing from 500 attendees up to 1500 attendees has been an interesting challenge with a lot of important choices. Moving from Utopolis (Mechelen) to Kinepolis (Antwerp) was one of these choices which was necessary to bring our conference to the next level. Starting with 6 parallel breakout sessions, we now almost doubled with 11 parallel breakout sessions and have about 100 speakers.

https://platform.twitter.com/widgets.js

We also evolved to not be the developer-only conference anymore by providing more IT Pro and Data related sessions. We noticed lots of differences in planning a show for 1500 people instead of 500 people. It required us to rethink our approach and planning to overcome the growing amount of work.

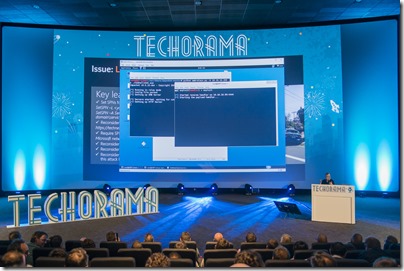
Each year we also noticed the increasing interest from other countries for our yearly conference. For Techorama 2018 we had attendees coming from 13 different countries: Belgium, The Netherlands, Norway, Denmark, Germany, Switzerland, Italy, Japan, Luxembourg, Poland, Romania, England and the USA.
TTFTechoramaPreview-47

What’s next?

The feedback in the past years from all our stakeholders (speakers, partners and attendees) has been very positive and we have been working hard to make it a long-term success by listening to all our customers. Today, it’s fair to say we kind of developed a business from our hobby and passion. As long as it feels we are not forced into another mandatory edition of Techorama, we will keep continuing what we are doing. Our first milestone has been achieved: creating a yearly international IT conference in Belgium with a premium experience for partners, speakers and attendees. Our next goal is to provide the same experience with organizing the first Techorama in the Netherlands (https://techorama.nl/).

We have a few other ideas up our sleeve but they are not ready yet for publication. Stay tuned for the next years. Our journey is not over yet!

A final thank you to all our partners and speakers for the continued support!


Generating Azure (VSALM) VMs from a specialized vhd file

January 3, 2018

From time to time I need to review how I run some of my Sparkles ALM workshops and make sure I can run a number of hands-on TFS exercises for the attendees. Doing demos is great to show what the possibilities are of an integrated ALM/DevOps platform, but nothing beats doing exercises yourself via the keyboard.

A long time ago I prepared exercises myself and this took quite a bit of effort, especially if you wanted to have some existing data in TFS to play with. When Brian Keller came up with a full-blown Visual Studio ALM virtual machine, I quickly realized I had to move into that direction. In the beginning (TFS 2010 timeframe) I paid for a big hosted server on the Internet where I could run a number of VMs via Hyper-V, but this was also very time-consuming and error-prone to have it up-and-running for my workshops.

Enter the cloud … Microsoft Azure! A perfect fit right? Upload vhd, create an image and ready for VM creation!

Well, I will save you all the details but in the past I managed to get it working after overcoming lots of different obstacles and it remained a very manual process … but it worked.

With the release of the new Visual Studio ALM VM for TFS 2018, I decided to have another go at it (what else to do during your Christmas holidays?) and script my way into having automated fresh VMs in Azure. First I failed a number of times creating a working VM image for TFS and providing a custom image for Azure Dev/Test Labs. The problem here might have been that creating the general image (sysprep instructions) kills the SQL connection for TFS. In the end I decided to abandon this approach and chose to upload a specialized vhd file to Azure and create VMs from that point. Many thanks to Sachin Hridayraj from Microsoft to provide me an already sanitized vhd file for upload to my Azure subscription. Sachin runs the ALM/DevOps Hands-On-Labs at https://almvm.azurewebsites.net/.

The Microsoft ALM/DevOps Hands-On-Labs is a set of self-paced labs based on Visual Studio Team Foundation Server and Visual Studio Team Services. Evaluating your next DevOps toolchain? Want to go deep and learn how you can implement modern DevOps practices with Visual Studio, Team Services and Azure? If you said yes to any of these questions, then this VM and Hands-on-labs are what you are looking for.

My PowerShell script to create VMs based on this uploaded vhd file can be consulted on GitHubGist. It will allow you to create a number of VMs based on the original VSALM vhd file provided at https://almvm.azurewebsites.net/. Be aware of some limitations (for example: number of cores) linked to your Azure subscriptions which might block you to generate extra VMs.

Hopefully in the (near) future I might move this one final step forward to create new VMs on the fly from Azure Dev/Test Labs.


Rename TFS Team Project Collection databases

December 3, 2017

When doing TFS migrations I’m often faced with mismatches between the name of the Team Project Collection and the underlying database file name. Instead of keeping track of which TPC is linked with a specific database file name, I recommend to keep the names aligned to avoid confusion.

How to do this?

First, make sure you have a valid backup of the complete TFS environment. The easiest way is to enable a built-in TFS backup plan.

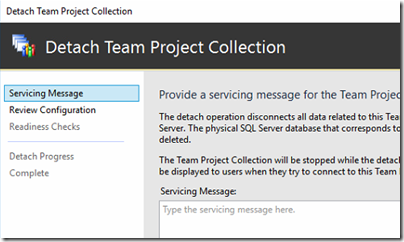
  • Detach the Team Project Collection via the TFS Administration Console

image

  • Detach the matching SQL Server database from SQL Management Studio

SNAGHTMLd6bfa5a

  • Rename the underlying database (.mdf) file to match the desired name for the Team Project Collection (prefix with Tfs_).
  • Attach the SQL database via the renamed .mdf file. A new log file database (.ldf) will automatically be created. You can remove the old .ldf file.

image

  • Attach the renamed database as a Team Project Collection via the TFS Administration Console and apply the desired Team Project Collection name (without prefix Tfs_).

Done!


TFS on-premises, how to add "Test Professional" users?

November 21, 2017

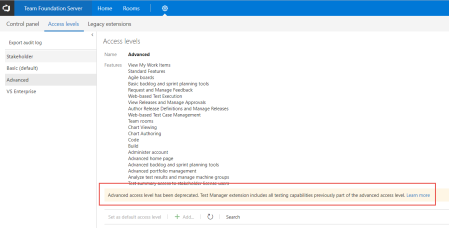
As from TFS 2017 Update 1, the traditional “Advanced” access level where to add users with a Test Professional license became deprecated and there’s no way anymore to add/remove users in this access level group.

Advanced access level has been deprecated. Test Manager extension includes all testing capabilities previously part of the advanced access level.

AdvancedAccessLevel

I noticed this caused a bit of confusion where to add new users with the Test Professional license to still provide them access to the advanced test features in TFS on-premises.

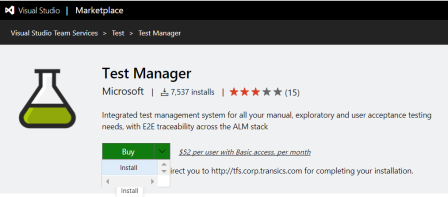
The right approach is first to make sure that the Test Manager extension is installed for the Team Project Collection.

TMExtension

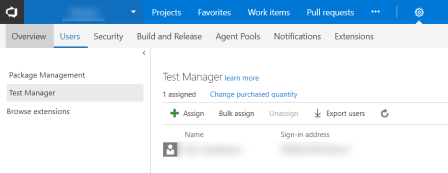
Once the extension is installed, you must navigate to the User Hub for the Team Project Collection where you can assign users to the Test Manager extension.

Users

You must install the Test Manager extension for all active Team Project Collections.


Code & Work Item Search for TFS 2017 – Troubleshooting

November 12, 2017

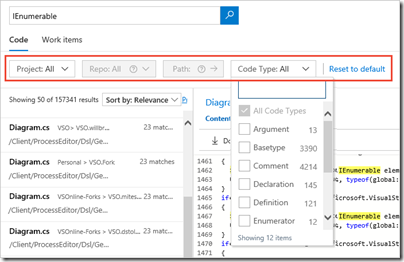
The Code Search extension for VSTS/TFS makes it easy to search for information across all your projects, from anywhere and any computer or mobile device, using just a simple web browser. You can narrow down your results and focus in on what you need by using filters.

CodeSearch

For TFS 2017 on-premises, Code Search includes Elasticsearch and will be configured on a server running TFS 2017. Work Item Search is now also relying on this functionality.

For large TFS enterprise environments with a lot of big code repositories the Search service might impact the performance of the TFS Application Tier when the Search service has been installed/configured on the same server.

These type of performance issues have been the case for a specific customer and the IT operations team have seen various huge CPU spikes for the Elasticsearch service on the TFS Application Tier.

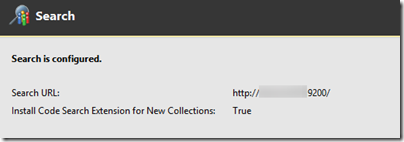
Together with an in-place upgrade to TFS 2017 Update 3, I recommended to move the Search service to a dedicated server in order to avoid performance issues on the TFS Application Tier. Compared to the typical straightforward TFS upgrade wizard experience, the move of the Search service to another service contains a number of manual activities.

SearchConfiguration

After completing all actions on the dedicated Search server and making sure that the TFS Application Tier could access the Search service on the Search Server via the default port 9200, I was able to complete the upgrade.

The TFS upgrade was a success, except the Search service was not working anymore.

SNAGHTML42be1913

The TFS Administration Console was showing no errors/warnings about the installed Search component.

SNAGHTML42c07979

Looking into some troubleshooting actions from the documentation didn’t help me to get to the root issue because the Search service seemed to be up-and-running, but wasn’t processing any data.

SNAGHTML42c6ccdc

Time to get in contact with the VSTS/TFS Product Team to log this incident and sharing all possible log files (detailed instructions how to do this) and look for potential solutions.

In the end – after some analysis of the logs – I was requested to perform a cleanup of the Index Data and to restart the indexing process on all Team Project Collections.

After going through this entire process, I was happy to see the ElasticSearch process coming to life again and claiming lots of CPU.

image

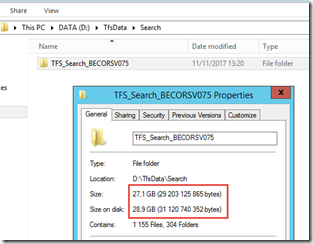
Also the TFS Search Data/Index folder on the Search Server was quickly getting flooded with a lot of data.

image

Mission finally accomplished! Upgraded to the lastest version of TFS 2017 and moving the Search Service to another server to avoid performance issues on the TFS Application Tier.

If you don’t want to get bothered with all this infrastructure and configuration, there’s an easy way out … Migrate your TFS on-premises environment to VSTS! 🙂


Update appsettings.json at deploy time with VSTS Release Management

July 27, 2017

Lately I have to deal more with .NET Core Web Applications to setup build and release definitions in VSTS. What always comes up is how to deal with specific application settings which must me updated for a specific environment.

I have always been a big advocate of making a clear separation between build and release. The build should simply generate a generic package while the release should pick up the package and deploy it to any possible environment. At deployment time the specific enviroment values should be injected. Web Deploy has been the obvious tool in the past to make this happen with the capability to update the generated setparameters.xml file in a deployment action which injected the environment values into the web.config file.

Now with .NET Core and the typical appsettings.json file, it has become really easy in VSTS to inject custom values into the appsettings.json file.

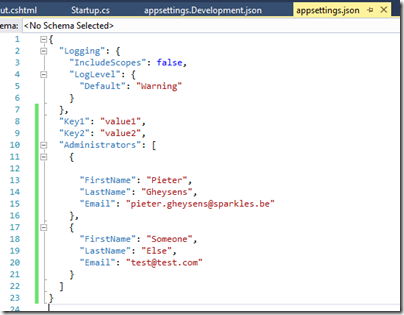
Example of appsettings.json file in my solution:

AppSettings

Imagine that you would want to replace the values for the different settings (as from line 8). Note that it will also be possible to replace the values in the “Administrators” array.

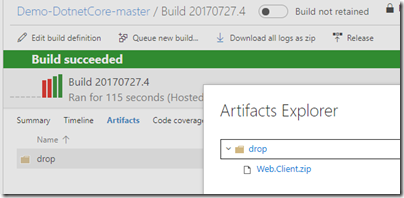
First, you will need to create a build in VSTS which produces the deployment zip package (via dotnet publish command).

BuildOutput

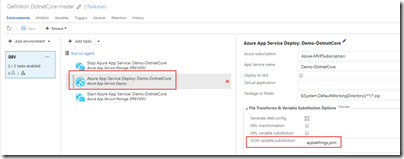
The VSTS release definition will link to the build output and you can use the built-in release task “Azure App Service Deploy” to deploy the build output to an Azure App Service.

ReleaseTask

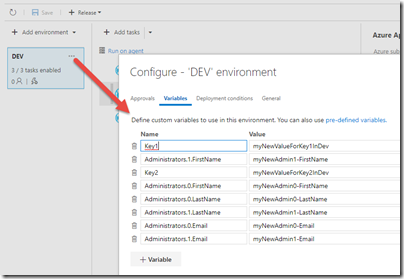
The “File Transformation” section in the release task offers the possibility to define the JSON variable substitution. You will need to provide the file name from the root and the environment values (pay attention to the format of the variable names) can be set for the “DEV” environment.

Variables

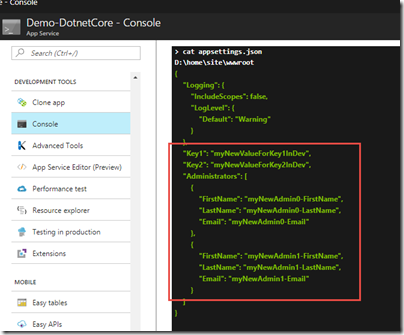
Doing a file lookup from the console in the Azure Portal after deployment shows the result of the appsettings file.

image

Simple solutions are always the best solutions!


Duration of a Full Backup Job in TFS

April 24, 2017

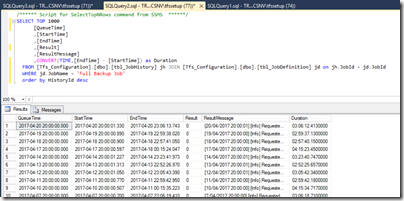
In order to properly plan a production migration of TFS I often also check the duration of a full backup. The easiest way to see the evolution of the latest Full Backups is to run a simple SQL Query in the TFS_Configuration database …

TFSFullBackupDuration

SELECT [QueueTime], [StartTime], [EndTime], [Result], [ResultMessage], CONVERT(TIME,[EndTime] – [StartTime]) as Duration  FROM [Tfs_Configuration].[dbo].[tbl_JobHistory] jh JOIN [Tfs_Configuration].[dbo].[tbl_JobDefinition] jd on jh.JobId = jd.JobId WHERE jd.JobName = ‘Full Backup Job’ order by HistoryId desc


Upgrade TFS Team Project features

April 20, 2017

When upgrading TFS, the existing Team Projects won’t automatically adopt the new features of the new TFS version. Some of the new features might require some updates to the Team Project. Note that this will only be required for TFS Team Projects … VSTS Team Projects are automatically updated with each service upgrade.

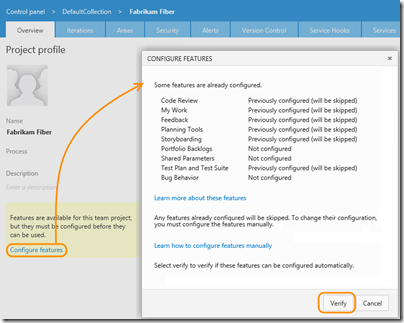
You can perform this update yourself via the Configure Features wizard. If the Configure Features link is visible for your Team Project, it means that the Team Project requires an update. Otherwise, the new features are already enabled.

alm_cfw_configfeatures

This might work if you don’t have a lot of Team Project Collections and Team Projects. During a recent upgrade to TFS 2017 Update 1 at a customer, I was confronted with 31 Team Project Collections and in total a bit more than 400 Team Projects. No way I was going to hit the configure features link 400 times …

I remember having done this already programmatically in the past (https://www.visualstudio.com/en-us/docs/work/customize/configure-features-after-upgrade#program-updates), but the issue now was that there wasn’t a ready-to-use solution for TFS 2017 Update 1. So, I used some tips & tricks from https://www.visualstudio.com/en-us/docs/work/customize/configure-features-after-upgrade#program-updates and also the Features4tfs CodePlex solution was a good starting point. I wanted to have a scenario where it’s possible to scan a complete TFS 2017 environment with all on-line Team Project Collections and all available Team Projects.

As a result, you can find my solution in Github: https://github.com/pietergheysens/TFSUpgradeTeamProjectFeatures. Because it worked for me with TFS 2017 (Update 1), it doesn’t mean it will work for you. Please test it first during a trial-upgrade and see if it helps you to upgrade your Team Projects in one go.